AWS ECS Cluster on EC2 with Terraform (2023)
This short guide will describe how to create an AWS ECS Cluster on EC2 in 2023. Basically there are already articles and code samples on the Internet, but some products in AWS are becoming obsolete (like Launch Configuration) and Terraform is undergoing API changes. So the purpose of this article is to show how to run ECS Cluster on EC2 with Terraform today.
This article will look at how to create a Terraform configuration to provide such resources:
- VPC with public subnet
- Internet Gateway to connect to the global Internet
- Security groups for EC2 Node & ECS Service
- Auto-scaling group for ECS cluster with Launch Templates
- Publish image to ECR
- ECS cluster with task and service definition
- Load Balancer to public access & scale ECS Service
Preparation
To get started, you need to create a new Terraform project. Let’s create new directory and main.tf file.
mkdir ecs-ec2-demo; cd ecs-ec2-demo; touch main.tf
In the Terraform file, it is required to declare the necessary dependencies and initialise the project.
terraform {
  required_providers {
    aws = { source = "hashicorp/aws", version = "5.17.0" }
  }
}

provider "aws" {
  profile = "default"
  region  = "us-east-1"
}
Creating a VPC
Let’s make a new VPC & two public subnets.
# --- VPC ---

data "aws_availability_zones" "available" { state = "available" }

locals {
  azs_count = 2
  azs_names = data.aws_availability_zones.available.names
}

resource "aws_vpc" "main" {
  cidr_block           = "10.10.0.0/16"
  enable_dns_hostnames = true
  enable_dns_support   = true
  tags                 = { Name = "demo-vpc" }
}

resource "aws_subnet" "public" {
  count                   = local.azs_count
  vpc_id                  = aws_vpc.main.id
  availability_zone       = local.azs_names[count.index]
  cidr_block              = cidrsubnet(aws_vpc.main.cidr_block, 8, 10 + count.index)
  map_public_ip_on_launch = true
  tags                    = { Name = "demo-public-${local.azs_names[count.index]}" }
}
Then create Internet Gateway:
# --- Internet Gateway ---

resource "aws_internet_gateway" "main" {
  vpc_id = aws_vpc.main.id
  tags   = { Name = "demo-igw" }
}

resource "aws_eip" "main" {
  count      = local.azs_count
  depends_on = [aws_internet_gateway.main]
  tags       = { Name = "demo-eip-${local.azs_names[count.index]}" }
}
And after it public route table:
# --- Public Route Table ---

resource "aws_route_table" "public" {
  vpc_id = aws_vpc.main.id
  tags   = { Name = "demo-rt-public" }

  route {
    cidr_block = "0.0.0.0/0"
    gateway_id = aws_internet_gateway.main.id
  }
}

resource "aws_route_table_association" "public" {
  count          = local.azs_count
  subnet_id      = aws_subnet.public[count.index].id
  route_table_id = aws_route_table.public.id
}
Now it is possible to run terraform apply and a new VPC with two public subnets will appear in AWS. Each subnet will placed in different Availability Zone (AZ) and have access to the Internet via IGW.
Note: Load Balancer requires at least two subnets created in different Availability Zones (AZ).
Creating a scalable ECS Cluster
The next step is to create a complete ECS Cluster.
# --- ECS Cluster ---

resource "aws_ecs_cluster" "main" {
  name = "demo-cluster"
}
The code above will create an empty cluster, but in order for the cluster to run containers it needs EC2 instances on which it will run these containers.
AWS can automatically create these EC2 instances and scaling them based on load, but for this we need to define Launch Template & Autoscaling Group. To implement this we need to create such resources:
- IAM Role for ECS Node
- Security Group (SG) for ECS Node
- Launch Template (describes EC2 instance)
- Autoscaling Group (AG)
- Capacity Provider to connect ECS Cluster & Autoscaling Group
IAM Role & Security Group for ECS EC2 Node
Let’s start from creating IAM Role for ECS Node:
# --- ECS Node Role ---

data "aws_iam_policy_document" "ecs_node_doc" {
  statement {
    actions = ["sts:AssumeRole"]
    effect  = "Allow"

    principals {
      type        = "Service"
      identifiers = ["ec2.amazonaws.com"]
    }
  }
}

resource "aws_iam_role" "ecs_node_role" {
  name_prefix        = "demo-ecs-node-role"
  assume_role_policy = data.aws_iam_policy_document.ecs_node_doc.json
}

resource "aws_iam_role_policy_attachment" "ecs_node_role_policy" {
  role       = aws_iam_role.ecs_node_role.name
  policy_arn = "arn:aws:iam::aws:policy/service-role/AmazonEC2ContainerServiceforEC2Role"
}

resource "aws_iam_instance_profile" "ecs_node" {
  name_prefix = "demo-ecs-node-profile"
  path        = "/ecs/instance/"
  role        = aws_iam_role.ecs_node_role.name
}
Then create simple Security Group for ECS Node which allow outgoing traffic (its required to pull image to start service later)
# --- ECS Node SG ---

resource "aws_security_group" "ecs_node_sg" {
  name_prefix = "demo-ecs-node-sg-"
  vpc_id      = aws_vpc.main.id

  egress {
    from_port   = 0
    to_port     = 65535
    protocol    = "tcp"
    cidr_blocks = ["0.0.0.0/0"]
  }
}
Launch Template
Next step is to create Launch Template for EC2 Instance.
# --- ECS Launch Template ---

data "aws_ssm_parameter" "ecs_node_ami" {
  name = "/aws/service/ecs/optimized-ami/amazon-linux-2/recommended/image_id"
}

resource "aws_launch_template" "ecs_ec2" {
  name_prefix            = "demo-ecs-ec2-"
  image_id               = data.aws_ssm_parameter.ecs_node_ami.value
  instance_type          = "t2.micro"
  vpc_security_group_ids = [aws_security_group.ecs_node_sg.id]

  iam_instance_profile { arn = aws_iam_instance_profile.ecs_node.arn }
  monitoring { enabled = true }

  user_data = base64encode(<<-EOF
      #!/bin/bash
      echo ECS_CLUSTER=${aws_ecs_cluster.main.name} >> /etc/ecs/ecs.config;
    EOF
  )
}
A couple of comments on the code above:
ecs_node_amiis the recommended image for ECS (but it possible to use another image by passing differentami)- In
user_datayou is required to pass ECS cluster name, so AWS can register EC2 instance as node of ECS cluster
Autoscaling Group
Next step is to create autoscaling group (ASG) and connect it with Launch Template:
# --- ECS ASG ---

resource "aws_autoscaling_group" "ecs" {
  name_prefix               = "demo-ecs-asg-"
  vpc_zone_identifier       = aws_subnet.public[*].id
  min_size                  = 2
  max_size                  = 8
  health_check_grace_period = 0
  health_check_type         = "EC2"
  protect_from_scale_in     = false

  launch_template {
    id      = aws_launch_template.ecs_ec2.id
    version = "$Latest"
  }

  tag {
    key                 = "Name"
    value               = "demo-ecs-cluster"
    propagate_at_launch = true
  }

  tag {
    key                 = "AmazonECSManaged"
    value               = ""
    propagate_at_launch = true
  }
}
This ASG will create from 2 to 8 instances of EC2 using Launch Template. Name tag is optional and used here just to simplify to recognise instances connected to cluster. AmazonECSManaged tag is required by AWS.
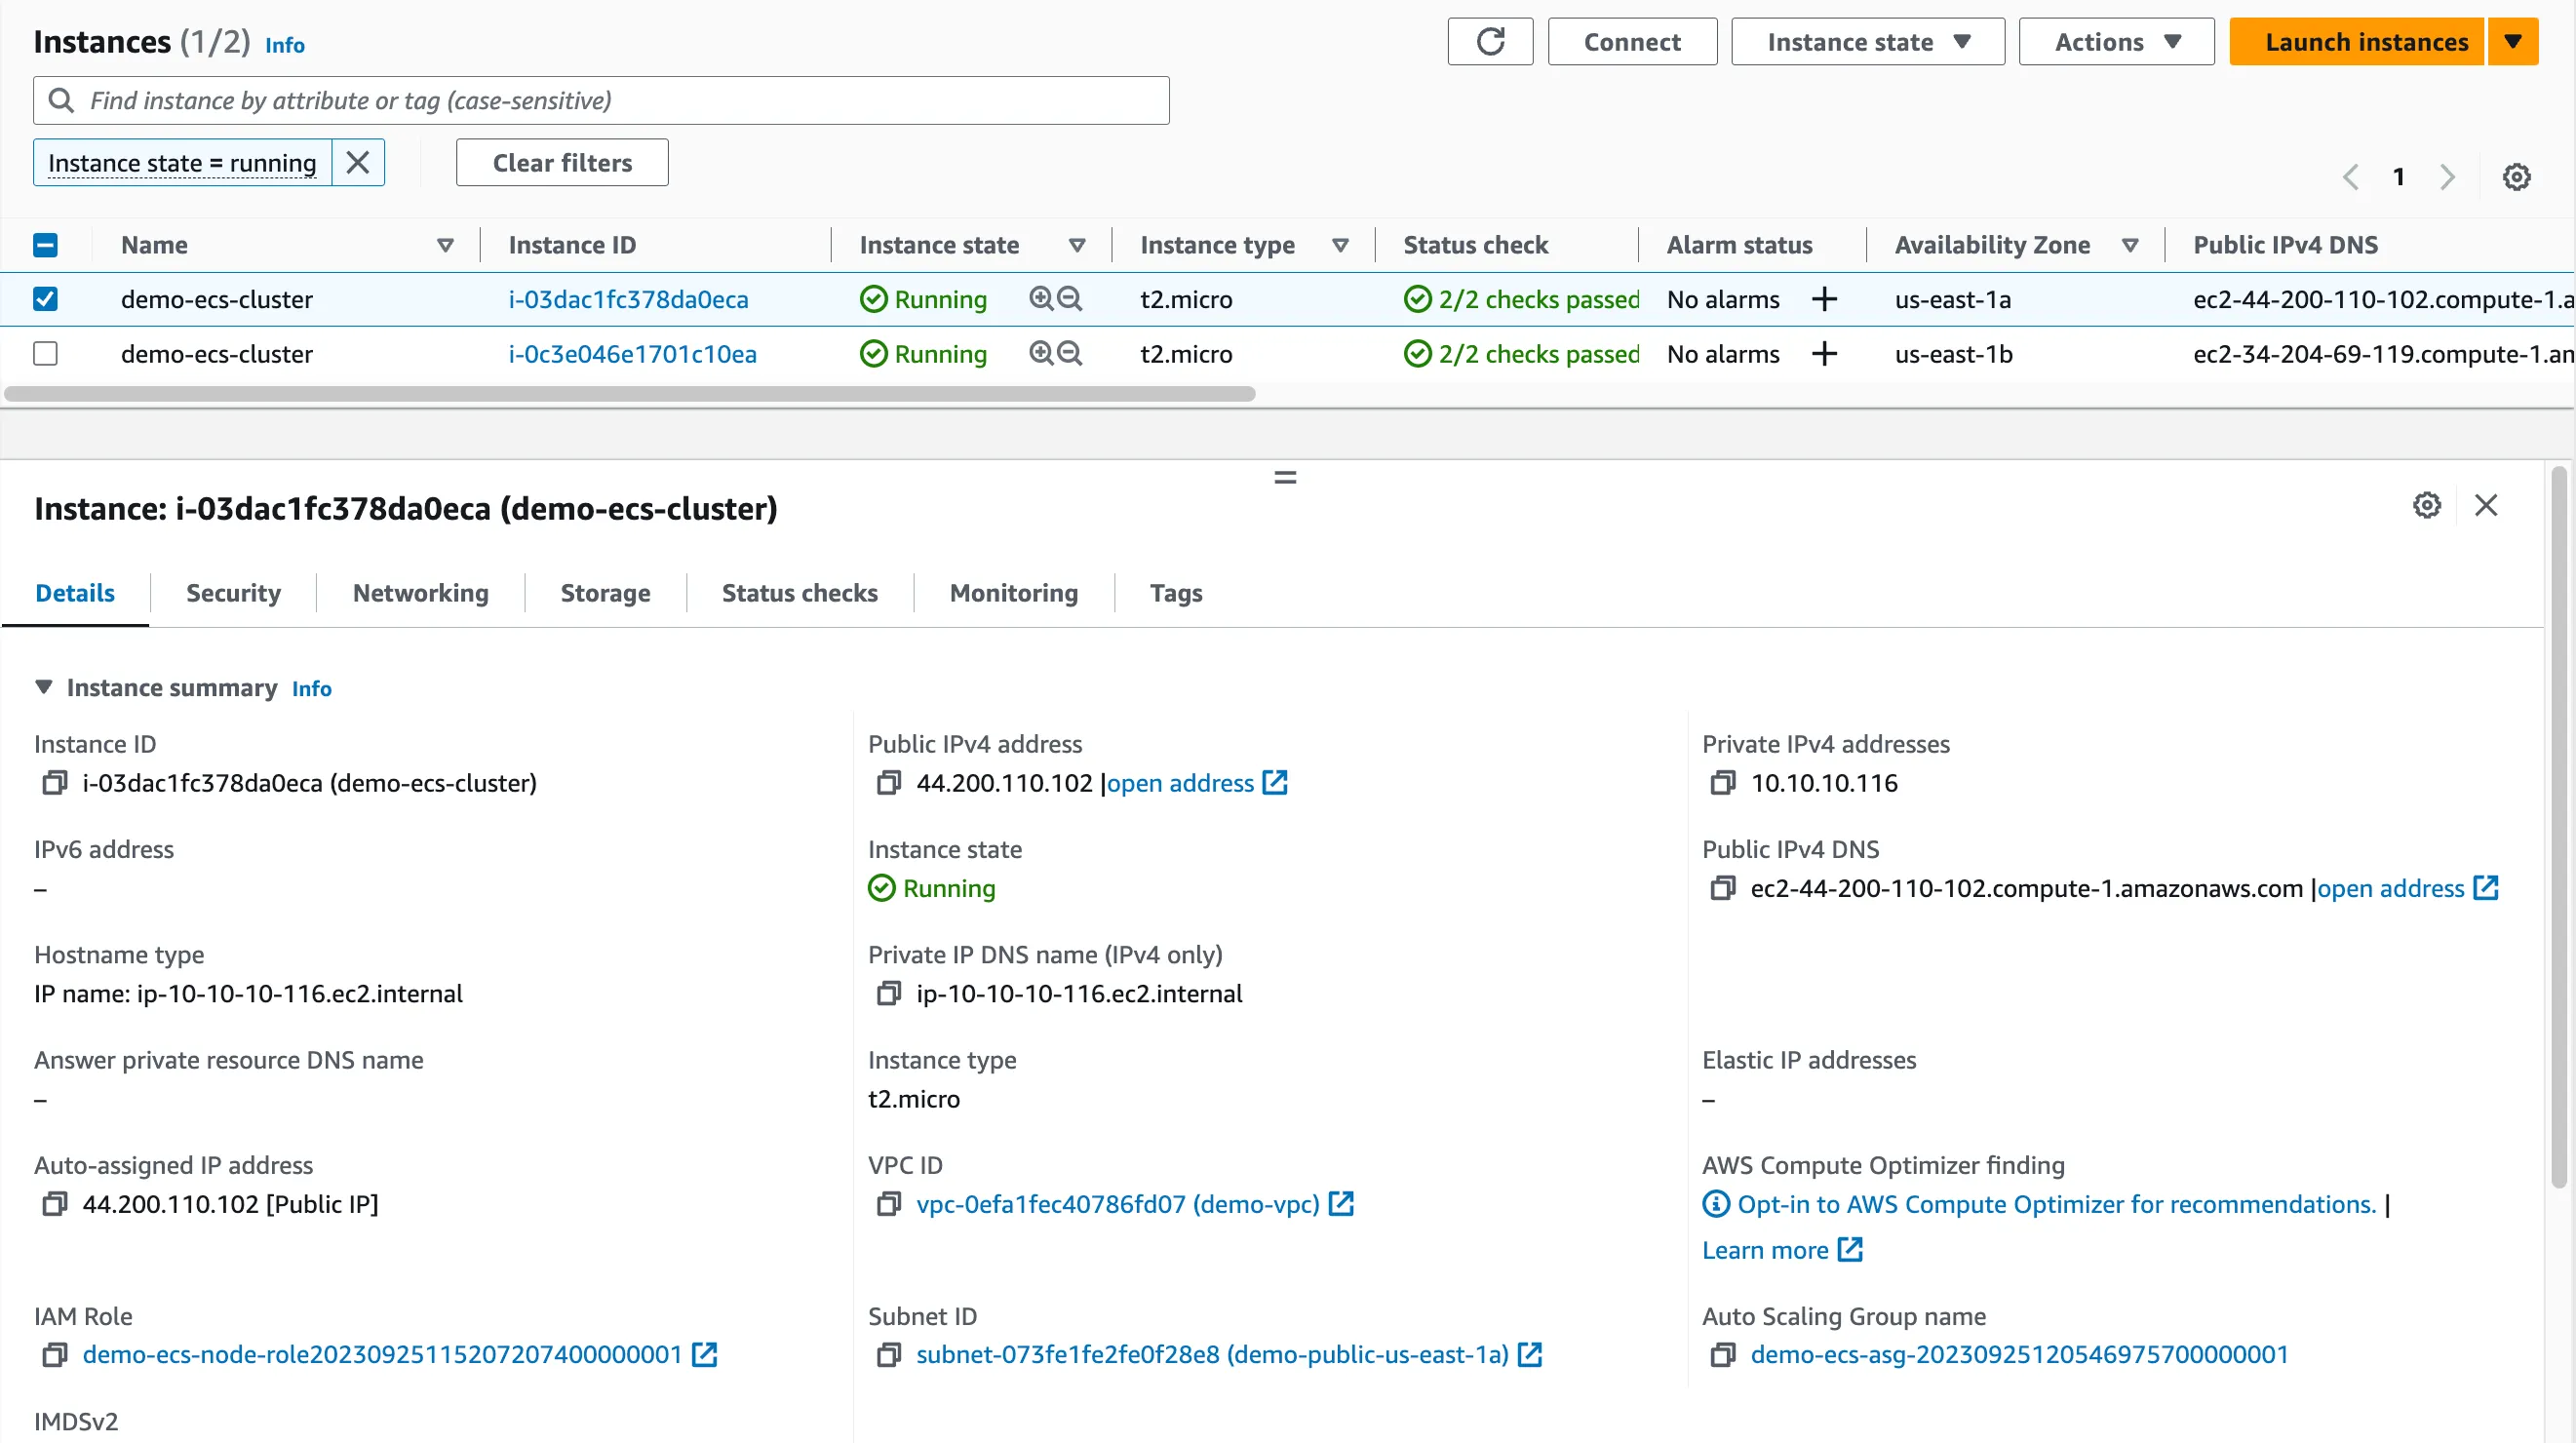
At this point we can run terraform apply again and make sure the ASG is working. AWS should create two EC2 instances. The can be seen at AWS Console > EC2 > Instances. If you manually Terminate any of these instances, AWS will automatically create a new instance to match the configuration of ASG (in our case minimum 2).
Capacity Provider
The last step is to connect the ECS Cluster to the ASG group so that the cluster can use EC2 instances to deploy containers.
# --- ECS Capacity Provider ---

resource "aws_ecs_capacity_provider" "main" {
  name = "demo-ecs-ec2"

  auto_scaling_group_provider {
    auto_scaling_group_arn         = aws_autoscaling_group.ecs.arn
    managed_termination_protection = "DISABLED"

    managed_scaling {
      maximum_scaling_step_size = 2
      minimum_scaling_step_size = 1
      status                    = "ENABLED"
      target_capacity           = 100
    }
  }
}

resource "aws_ecs_cluster_capacity_providers" "main" {
  cluster_name       = aws_ecs_cluster.main.name
  capacity_providers = [aws_ecs_capacity_provider.main.name]

  default_capacity_provider_strategy {
    capacity_provider = aws_ecs_capacity_provider.main.name
    base              = 1
    weight            = 100
  }
}
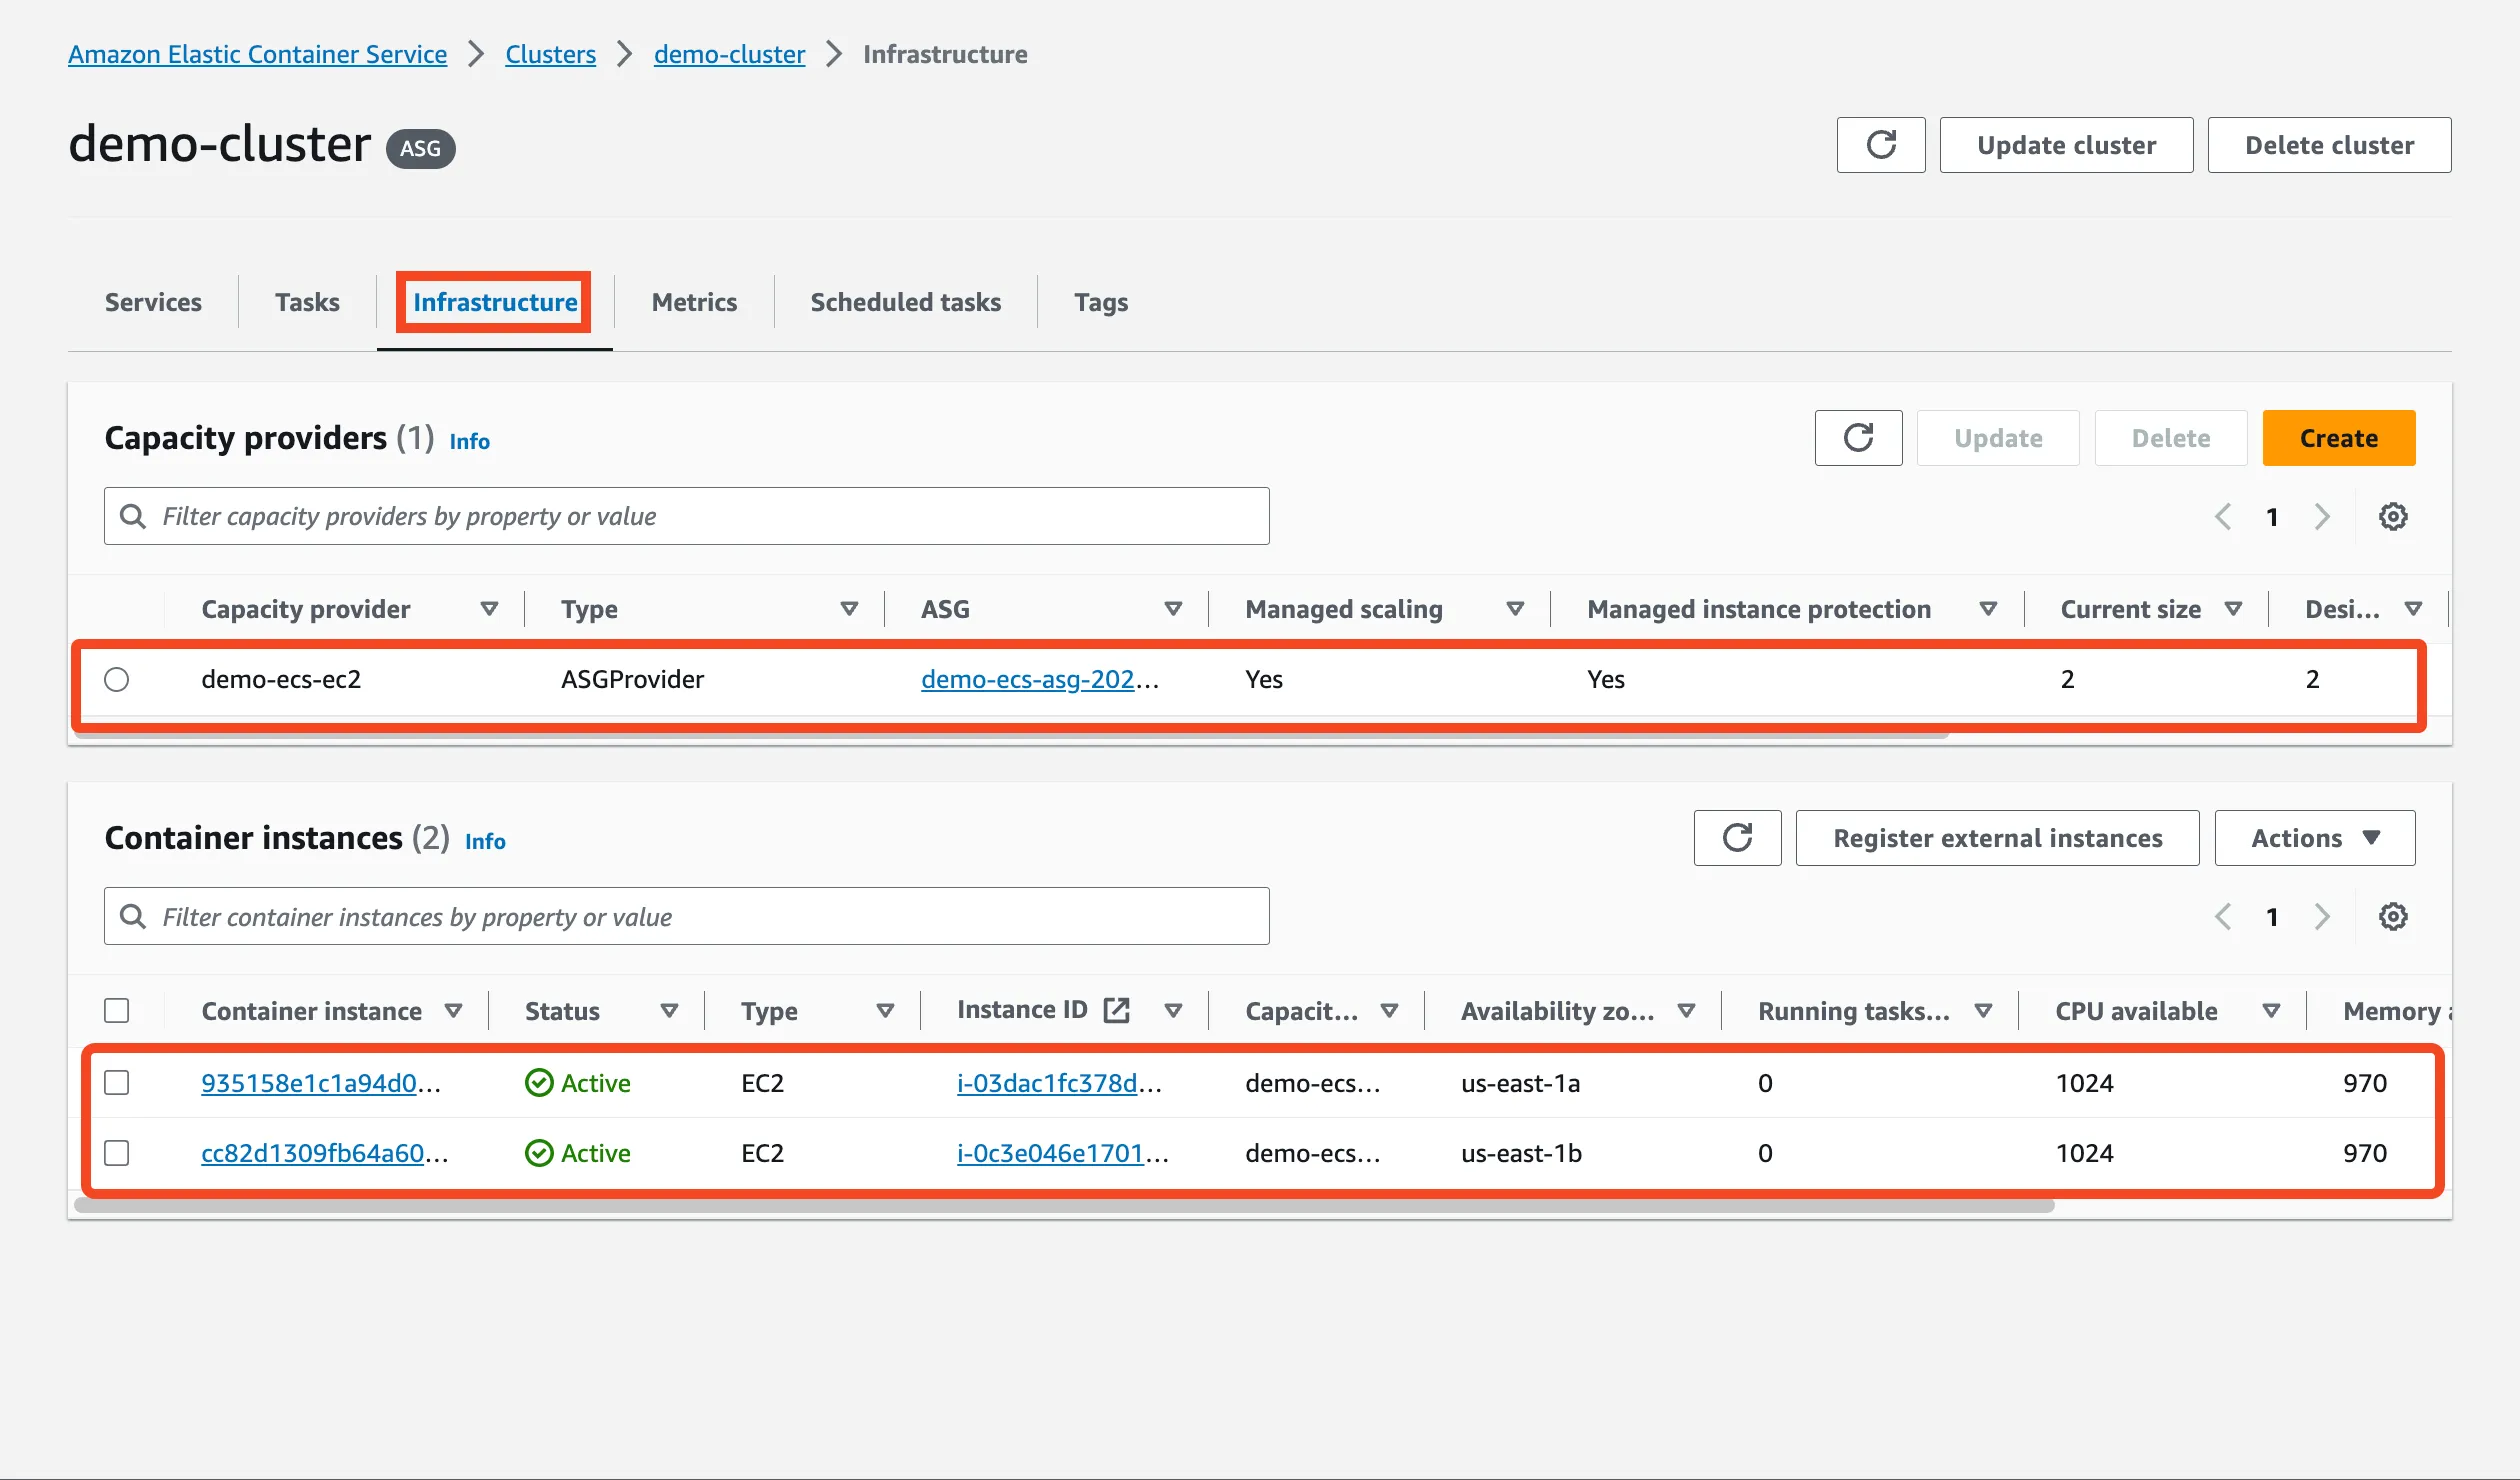
Run terraform apply again and after it we should see Capacity Provider & EC2 instances connect to ECS cluster on AWS Console > ECS > demo-cluster > Infrastructure tab.
Creating ECS Service
The last step is to run the service on the ECS and configure heath check and autoscaling for it. Plan of Action:
- Create Elastic Container Registry (ECR) & push image
- Create IAM Role for ECS Task
- Create ECS Task Definition
- Create Security Group for service
- Create ECS Service
- Create Load Balancer
Elastic Container Registry (ECR)
The example will use helloword-http server, which we will run in our private ECR.
# --- ECR ---

resource "aws_ecr_repository" "app" {
  name                 = "demo-app"
  image_tag_mutability = "MUTABLE"
  force_delete         = true

  image_scanning_configuration {
    scan_on_push = true
  }
}

output "demo_app_repo_url" {
  value = aws_ecr_repository.app.repository_url
}
Let’s run terraform apply again. We should see output with repository URL in AWS. Now push helloword-http to ECR.
# Get AWS repo url from Terraform outputs
export REPO=$(terraform output --raw demo_app_repo_url)
# Login to AWS ECR
aws ecr get-login-password | docker login --username AWS --password-stdin $REPO

# Pull docker image & push to our ECR
docker pull --platform linux/amd64 strm/helloworld-http:latest
docker tag strm/helloworld-http:latest $REPO:latest
docker push $REPO:latest
After this image should be available in AWS Console > AWS ECR > demo-app and it can be used as source for ECS Task Definition.
Note: In case you are using ECS Nodes on ARM processors, use --platform linux/arm64
IAM Role for ECS Task
Next required step is to defined IAM roles for ECS task. Roles required to have access ECR, Cloud Watch, etc.
# --- ECS Task Role ---

data "aws_iam_policy_document" "ecs_task_doc" {
  statement {
    actions = ["sts:AssumeRole"]
    effect  = "Allow"

    principals {
      type        = "Service"
      identifiers = ["ecs-tasks.amazonaws.com"]
    }
  }
}

resource "aws_iam_role" "ecs_task_role" {
  name_prefix        = "demo-ecs-task-role"
  assume_role_policy = data.aws_iam_policy_document.ecs_task_doc.json
}

resource "aws_iam_role" "ecs_exec_role" {
  name_prefix        = "demo-ecs-exec-role"
  assume_role_policy = data.aws_iam_policy_document.ecs_task_doc.json
}

resource "aws_iam_role_policy_attachment" "ecs_exec_role_policy" {
  role       = aws_iam_role.ecs_exec_role.name
  policy_arn = "arn:aws:iam::aws:policy/service-role/AmazonECSTaskExecutionRolePolicy"
}
Cloud Watch Logs
Next small step is to create Cloud Watch logs group to be able to see container logs.
# --- Cloud Watch Logs ---

resource "aws_cloudwatch_log_group" "ecs" {
  name              = "/ecs/demo"
  retention_in_days = 14
}
ECS Task Definition
At this point, we simply describe from where and how to launch the docker container.
Note: Task Definition is created per AWS account, not per ECS Cluster. So the family name must be unique.
# --- ECS Task Definition ---

resource "aws_ecs_task_definition" "app" {
  family             = "demo-app"
  task_role_arn      = aws_iam_role.ecs_task_role.arn
  execution_role_arn = aws_iam_role.ecs_exec_role.arn
  network_mode       = "awsvpc"
  cpu                = 256
  memory             = 256

  container_definitions = jsonencode([{
    name         = "app",
    image        = "${aws_ecr_repository.app.repository_url}:latest",
    essential    = true,
    portMappings = [{ containerPort = 80, hostPort = 80 }],

    environment = [
      { name = "EXAMPLE", value = "example" }
    ]

    logConfiguration = {
      logDriver = "awslogs",
      options = {
        "awslogs-region"        = "us-east-1",
        "awslogs-group"         = aws_cloudwatch_log_group.ecs.name,
        "awslogs-stream-prefix" = "app"
      }
    },
  }])
}
ECS Service
In order for the ECS service to be available within the cluster and have access to the Internet, a new Security Group must be created. ecs_svc allows all incoming and outgoing traffic. The service itself will be inside the subnet, without public ip, so it will not be accessible from the Internet. SG allows access to the service only for VPC network members.
# --- ECS Service ---

resource "aws_security_group" "ecs_task" {
  name_prefix = "ecs-task-sg-"
  description = "Allow all traffic within the VPC"
  vpc_id      = aws_vpc.main.id

  ingress {
    from_port   = 0
    to_port     = 0
    protocol    = "-1"
    cidr_blocks = [aws_vpc.main.cidr_block]
  }

  egress {
    from_port   = 0
    to_port     = 0
    protocol    = "-1"
    cidr_blocks = ["0.0.0.0/0"]
  }
}

resource "aws_ecs_service" "app" {
  name            = "app"
  cluster         = aws_ecs_cluster.main.id
  task_definition = aws_ecs_task_definition.app.arn
  desired_count   = 2

  network_configuration {
    security_groups = [aws_security_group.ecs_task.id]
    subnets         = aws_subnet.public[*].id
  }

  capacity_provider_strategy {
    capacity_provider = aws_ecs_capacity_provider.main.name
    base              = 1
    weight            = 100
  }

  ordered_placement_strategy {
    type  = "spread"
    field = "attribute:ecs.availability-zone"
  }

  lifecycle {
    ignore_changes = [desired_count]
  }
}
The ordered_placement_strategy will try to make sure that each service instance is equally distributed across Availability Zones. You can use a different placement strategy, read the AWS documentation about it.
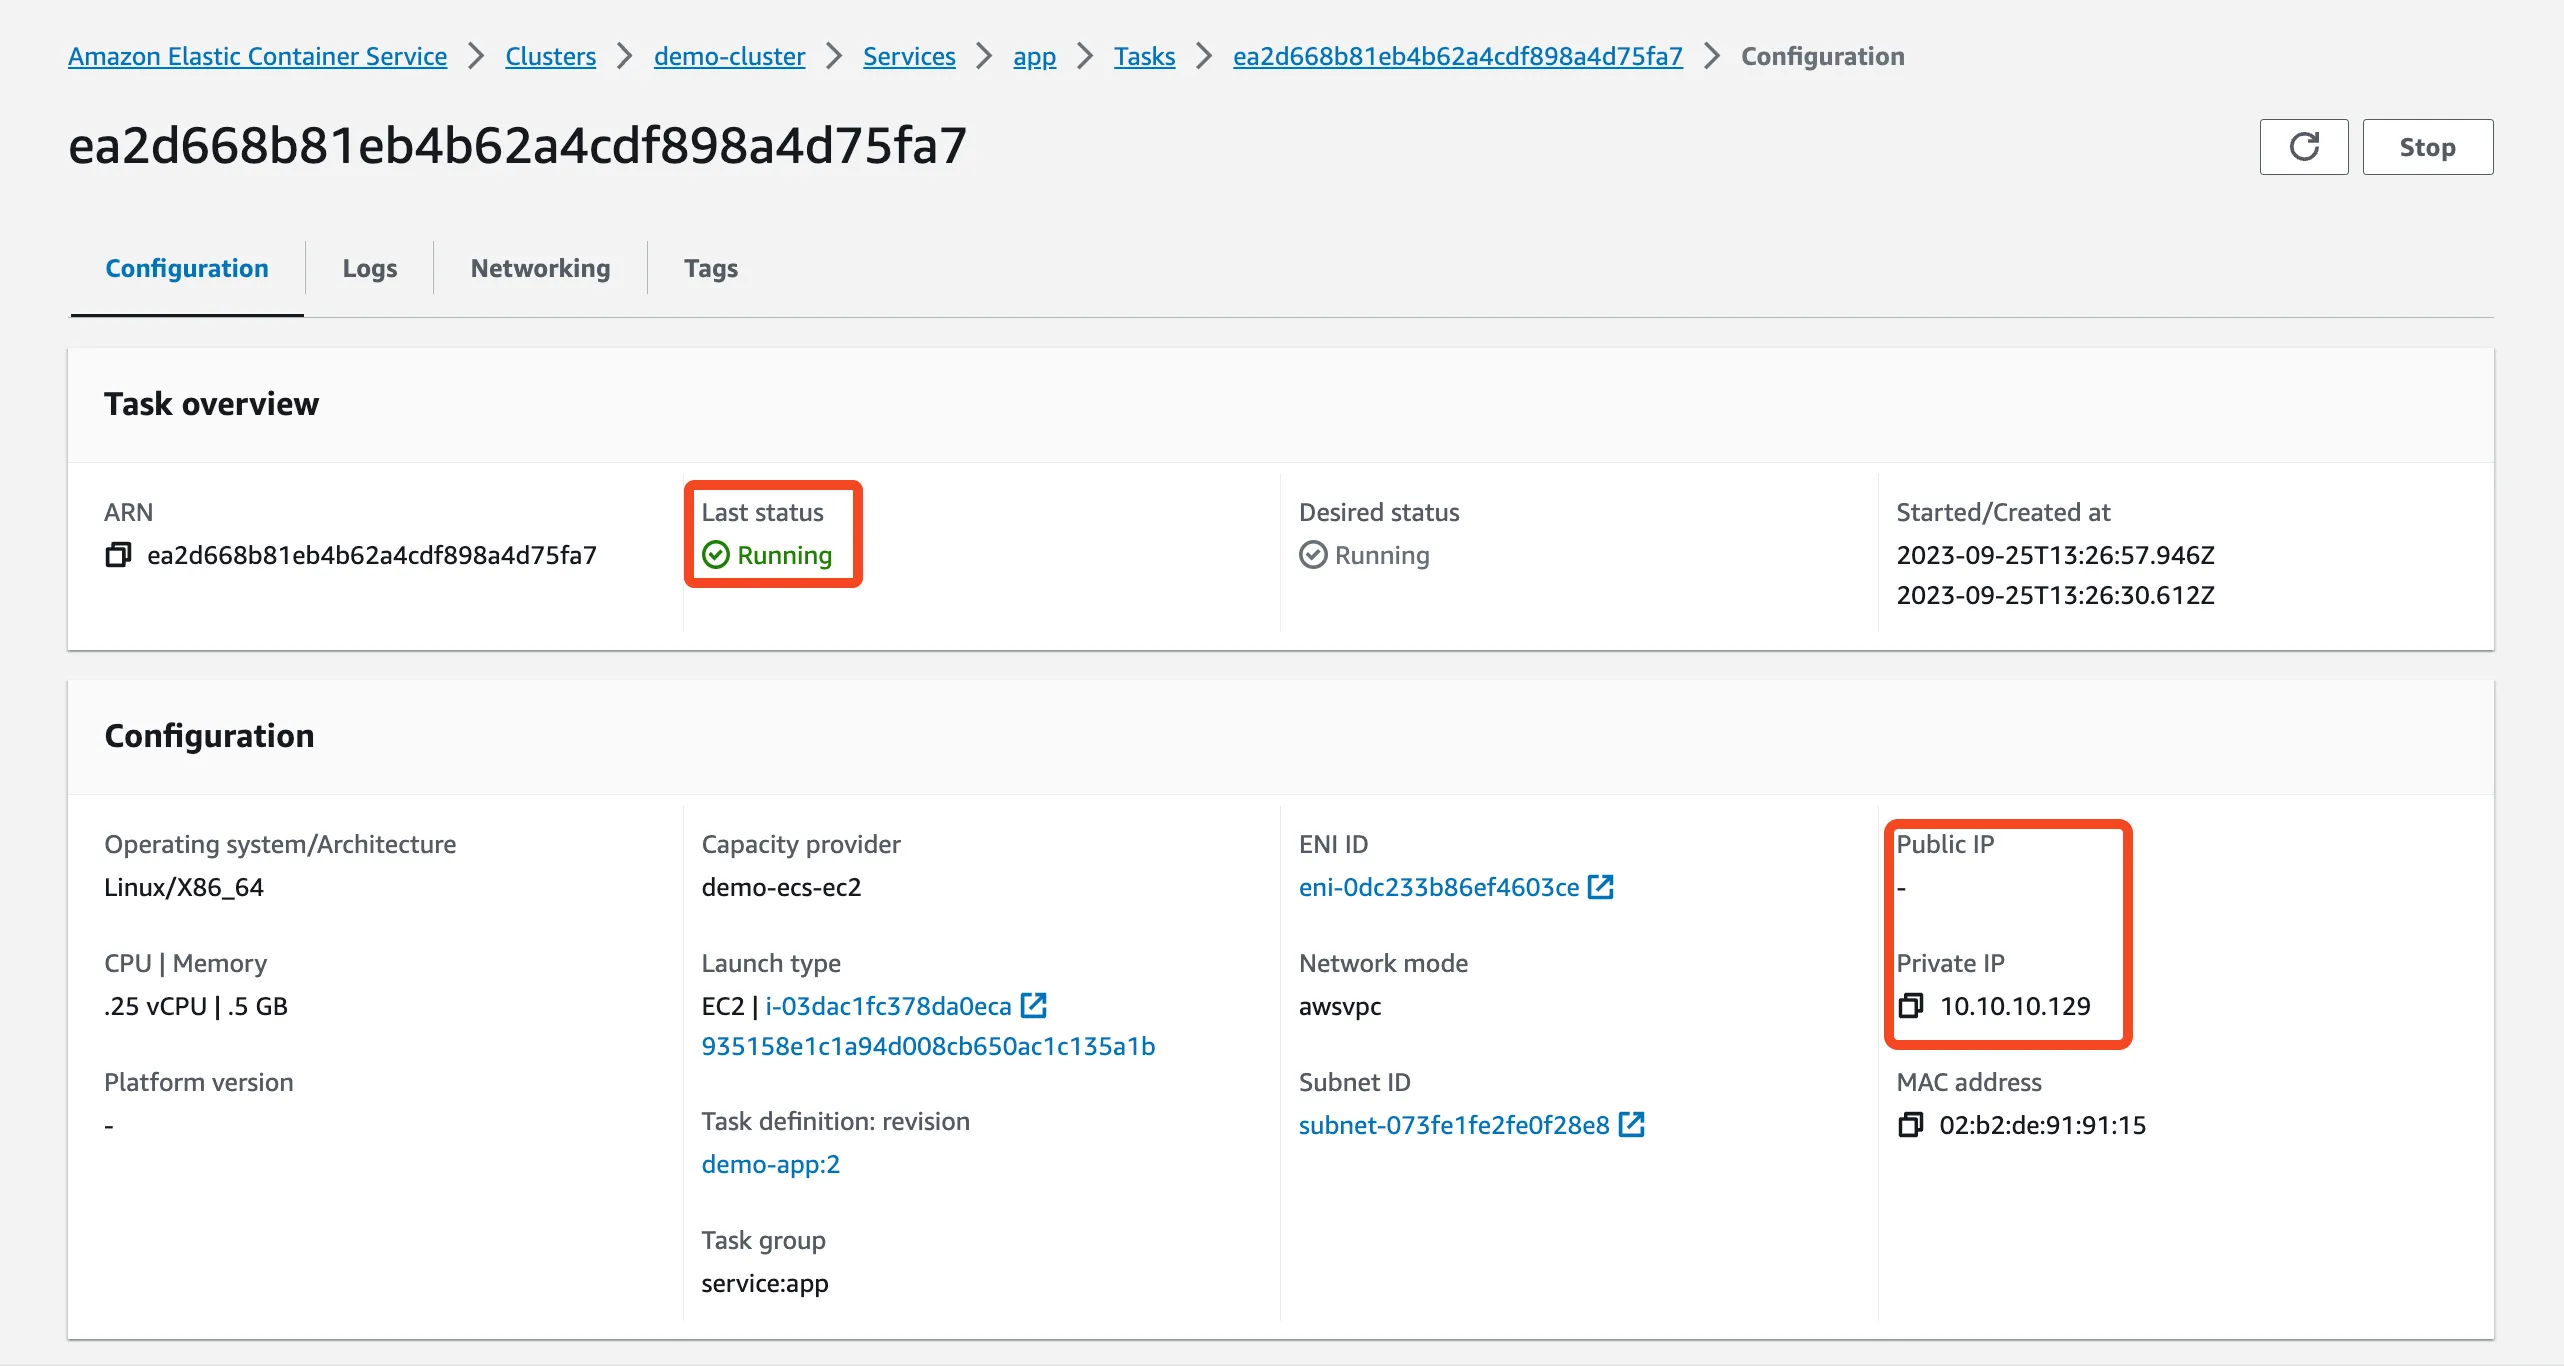
If we run terraform apply at this step it will create & run new service. But because this service has no Public IP, we can't access to it from public Internet. But service accessible from internal VPC. So if we create a Bastion Host we can ping it.
To make the service available from the public network, as well as to be able to scale the service depending on the load we need to create Load Balancer.
Load Balancer (ALB)
ALB also needs a Security Group. We will allow any incoming traffic on ports 80 and 443. Next, the ALB will listen on port 80 and forward the traffic to our ECS Service. This is the simplest ALB setup sufficient for this article.
# --- ALB ---

resource "aws_security_group" "http" {
  name_prefix = "http-sg-"
  description = "Allow all HTTP/HTTPS traffic from public"
  vpc_id      = aws_vpc.main.id

  dynamic "ingress" {
    for_each = [80, 443]
    content {
      protocol    = "tcp"
      from_port   = ingress.value
      to_port     = ingress.value
      cidr_blocks = ["0.0.0.0/0"]
    }
  }

  egress {
    protocol    = "-1"
    from_port   = 0
    to_port     = 0
    cidr_blocks = ["0.0.0.0/0"]
  }
}

resource "aws_lb" "main" {
  name               = "demo-alb"
  load_balancer_type = "application"
  subnets            = aws_subnet.public[*].id
  security_groups    = [aws_security_group.http.id]
}

resource "aws_lb_target_group" "app" {
  name_prefix = "app-"
  vpc_id      = aws_vpc.main.id
  protocol    = "HTTP"
  port        = 80
  target_type = "ip"

  health_check {
    enabled             = true
    path                = "/"
    port                = 80
    matcher             = 200
    interval            = 10
    timeout             = 5
    healthy_threshold   = 2
    unhealthy_threshold = 3
  }
}

resource "aws_lb_listener" "http" {
  load_balancer_arn = aws_lb.main.id
  port              = 80
  protocol          = "HTTP"

  default_action {
    type             = "forward"
    target_group_arn = aws_lb_target_group.app.id
  }
}

output "alb_url" {
  value = aws_lb.main.dns_name
}
The output alb_url displays the ALB URL provided by AWS. We can ping this url to prove that ALB is working. If we try to ping alb_url right now it will respond with 503 code — that expected because ALB Target Group is empty right now.
Connect ECS Service to ALB
At the final stage, we need to update the aws_ecs_service configuration by adding a section with load_balancer.
# --- ECS Service ---

resource "aws_ecs_service" "app" {
  # ...

  depends_on = [aws_lb_target_group.app]

  load_balancer {
    target_group_arn = aws_lb_target_group.app.arn
    container_name   = "app"
    container_port   = 80
  }
}
Finally run terraform apply. ECS Service will be started and we can check it on ALB URL provided by AWS:
curl $(terraform output --raw alb_url) # Hello from ip-10-10-10-XXX
curl $(terraform output --raw alb_url) # Hello from ip-10-10-11-YYY
If we run CURL multiple times, it should write "Hello from HOSTNAME", the hostname will be different between calls, indicating that ALB is working and redirecting requests to different copies of the ECS Service.
Bonus: ECS Service Auto Scaling
# --- ECS Service Auto Scaling ---

resource "aws_appautoscaling_target" "ecs_target" {
  service_namespace  = "ecs"
  scalable_dimension = "ecs:service:DesiredCount"
  resource_id        = "service/${aws_ecs_cluster.main.name}/${aws_ecs_service.app.name}"
  min_capacity       = 2
  max_capacity       = 5
}

resource "aws_appautoscaling_policy" "ecs_target_cpu" {
  name               = "application-scaling-policy-cpu"
  policy_type        = "TargetTrackingScaling"
  service_namespace  = aws_appautoscaling_target.ecs_target.service_namespace
  resource_id        = aws_appautoscaling_target.ecs_target.resource_id
  scalable_dimension = aws_appautoscaling_target.ecs_target.scalable_dimension

  target_tracking_scaling_policy_configuration {
    predefined_metric_specification {
      predefined_metric_type = "ECSServiceAverageCPUUtilization"
    }

    target_value       = 80
    scale_in_cooldown  = 300
    scale_out_cooldown = 300
  }
}

resource "aws_appautoscaling_policy" "ecs_target_memory" {
  name               = "application-scaling-policy-memory"
  policy_type        = "TargetTrackingScaling"
  resource_id        = aws_appautoscaling_target.ecs_target.resource_id
  scalable_dimension = aws_appautoscaling_target.ecs_target.scalable_dimension
  service_namespace  = aws_appautoscaling_target.ecs_target.service_namespace

  target_tracking_scaling_policy_configuration {
    predefined_metric_specification {
      predefined_metric_type = "ECSServiceAverageMemoryUtilization"
    }

    target_value       = 80
    scale_in_cooldown  = 300
    scale_out_cooldown = 300
  }
}
Here is the end of ECS cluster configuration. Next it is possible to add a domain name, SSL certificate, https termination, routing traffic between different ECS services — but all this is stuff for other articles.