REST API Deployment on AWS Lambda with Terraform (2023)
In this article I will show the way how to deploy AWS Lambda using Terraform, with support for code updates in a single workflow.
The problem with AWS Lambda is that at the time of its creation we need to have prepared code in zip archive or Docker image uploaded to ECR, unlike ECS / Kubernetes service, where we just specify the path to the repository, which can be empty at the creation stage. So to make an AWS Lambda deploy using Terraform we will need to prepare the code in the same Terraform recipe.
In this article I will use the Docker image as source for AWS Lambda, as it is essentially the only one normal way to run any complex applications in Lambda that have external dependencies (libraries). There is a way to package the dependencies in a zip archive too, but if the architecture of the computer where the dependencies were built is different from the one where AWS Lambda runs, there will be problems. That’s why Docker is the most clear and reliable option.
So this article will explore the creation of such resources:
- Simple HTTP server on Python with FastAPI
- Docker image to that application
- Creating ECR storage
- Build & push Docker image in Terraform file (null_resource)
- Creating AWS Lambda
- Creating access to Lambda from public url
- Updating Lambda on code change
Preparation
As usual, we start our work by creating a new project and declaring terraform dependencies:
mkdir lambda-demo; cd lambda-demo; touch main.tf
Describe Terraform dependencies in main.tf file
terraform {
  required_providers {
    aws = { source = "hashicorp/aws", version = "5.17.0" }
  }
}

provider "aws" {
  profile = "default"
  region  = "us-east-1"
}
Creating HTTP application with FastAPI
Let’s create subfolder for our code and create 3 files:
mkdir code; touch code/app.py code/requirements.txt code/Dockerfile
Next, in the app.py file add the application code:
import os
import uvicorn
from fastapi import FastAPI
from mangum import Mangum


app = FastAPI()


@app.get("/")
def index():
    return "Hello, from AWS Lambda!"


handler = Mangum(app, lifespan="off")

if __name__ == "__main__":
    uvicorn_app = f"{os.path.basename(__file__).removesuffix('.py')}:app"
    uvicorn.run(uvicorn_app, host="0.0.0.0", port=8000, reload=True)
This code runs the FastAPI service, so we can write basically as much complex API as we want. Mangum is a wrapper for the Lambda API, it does all the request processing logic in Lambda internally, allowing FastAPI to work normally. The code in the __name__ == "__main__" section is needed to run the application during development — we can write our API locally as usual.
The following library should be added to requirements.txt:
fastapi==0.103.2
mangum==0.17.0
uvicorn==0.23.2
And finally the Dockerfile to build an image for our application:
FROM public.ecr.aws/lambda/python:3.11
ENV PYTHONUNBUFFERED=1

COPY requirements.txt ./
RUN pip3 install -r requirements.txt

COPY app.py ./
CMD [ "app.handler" ]
Creating ECR
We have the application ready, now we need to run it in AWS Lambda. First of all, we need to create a resource for ECR image. All the work below continues in the main.tf file.
# --- ECR ---

resource "aws_ecr_repository" "api" {
  name                 = "lambda-api"
  image_tag_mutability = "MUTABLE"
  force_delete         = true

  image_scanning_configuration {
    scan_on_push = true
  }
}
Build & Push Docker image
The next step is to build the image directly in the Terraform recipe. For this purpose null_resource will be used.
# --- Build & push image ---

locals {
  repo_url = aws_ecr_repository.api.repository_url
}

resource "null_resource" "image" {
  triggers = {
    hash = md5(join("-", [for x in fileset("", "./code/{*.py,*.txt,Dockerfile}") : filemd5(x)]))
  }

  provisioner "local-exec" {
    command = <<EOF
      aws ecr get-login-password | docker login --username AWS --password-stdin ${local.repo_url}
      docker build --platform linux/amd64 -t ${local.repo_url}:latest ./code
      docker push ${local.repo_url}:latest
    EOF
  }
}

data "aws_ecr_image" "latest" {
  repository_name = aws_ecr_repository.api.name
  image_tag       = "latest"
  depends_on      = [null_resource.image]
}
The local-exec part is a classic bash script that logs into ECR, builds and flushes the image. We just wrote it in a Terraform file directly.
The more interesting part is the triggers. It is needed to rebuild the image every time the files in the code folder are changed. The files are selected by mask, so if you need other extensions you should add them to the list.
And the last block is to get information about the last loaded image in ECR. We will need this next to update AWS Lambda.
Creating Lambda resource
As is typical in AWS, we need permissions to perform various actions. Lambda is no exception and needs a separate role as well. Let’s create a new role with access to Lambda functions and the ability to write logs.
# --- IAM Role ---

resource "aws_iam_role" "lambda" {
  name = "lambda"

  assume_role_policy = jsonencode({
    Version = "2012-10-17"
    Statement = [{
      Effect    = "Allow"
      Action    = "sts:AssumeRole"
      Principal = { Service = "lambda.amazonaws.com" }
    }]
  })
}

resource "aws_iam_role_policy_attachment" "lambda_logs" {
  role       = aws_iam_role.lambda.name
  policy_arn = "arn:aws:iam::aws:policy/service-role/AWSLambdaBasicExecutionRole"
}
Next, we create a resource for the Lambda function:
# --- Lambda ---

resource "aws_cloudwatch_log_group" "api" {
  name              = "/aws/lambda/api"
  retention_in_days = 14
}

resource "aws_lambda_function" "api" {
  function_name    = "api"
  role             = aws_iam_role.lambda.arn
  image_uri        = "${aws_ecr_repository.api.repository_url}:latest"
  package_type     = "Image"
  source_code_hash = trimprefix(data.aws_ecr_image.latest.id, "sha256:")
  timeout          = 10

  environment {
    variables = {}
  }

  depends_on = [
    null_resource.image,
    aws_iam_role_policy_attachment.lambda_logs,
    aws_cloudwatch_log_group.api,
  ]
}
Lambda public endpoint
Finally we need to create public endpoint. CORS block required to access API from browser. In this article all values is wildcard, but you can change it as your requirements, like: allow_origins = ["https://my-domain.com"]
# --- Lambda Endpoint ---

resource "aws_lambda_function_url" "api" {
  function_name      = aws_lambda_function.api.function_name
  authorization_type = "NONE"

  cors {
    allow_credentials = true
    allow_origins     = ["*"]
    allow_methods     = ["*"]
    allow_headers     = ["date", "keep-alive"]
    expose_headers    = ["keep-alive", "date"]
    max_age           = 86400
  }
}

output "api_url" {
  value = aws_lambda_function_url.api.function_url
}
Deploying
Initialise terraform and apply the configuration:
terraform init
terraform validate && terraform apply
Once this is complete, we will see a link to AWS Lambda:
Apply complete! Resources: 7 added, 0 changed, 0 destroyed.

Outputs:

api_url = "https://xxx.lambda-url.us-east-1.on.aws/"
Let’s try:
https $(terraform output -raw api_url)
HTTP/1.1 200 OK
Connection: keep-alive
Content-Length: 25
Content-Type: application/json
Date: Thu, 12 Oct 2023 13:19:40 GMT
X-Amzn-Trace-Id: root=1-6527e150-3c0aed5e335681cb7e120cde;sampled=0;lineage=1da281dc:0
x-amzn-Remapped-content-length: 25
x-amzn-RequestId: a560d83b-40c4-4c27-a381-0bb630547a4a

"Hello, from AWS Lambda!"
It’s works!
Updating code and deploy new version
Since we have prepared all the necessary invalidations above, we simply update the app.py file and re-run terraform apply. I’ll just add v2 to the welcome text. Check it:
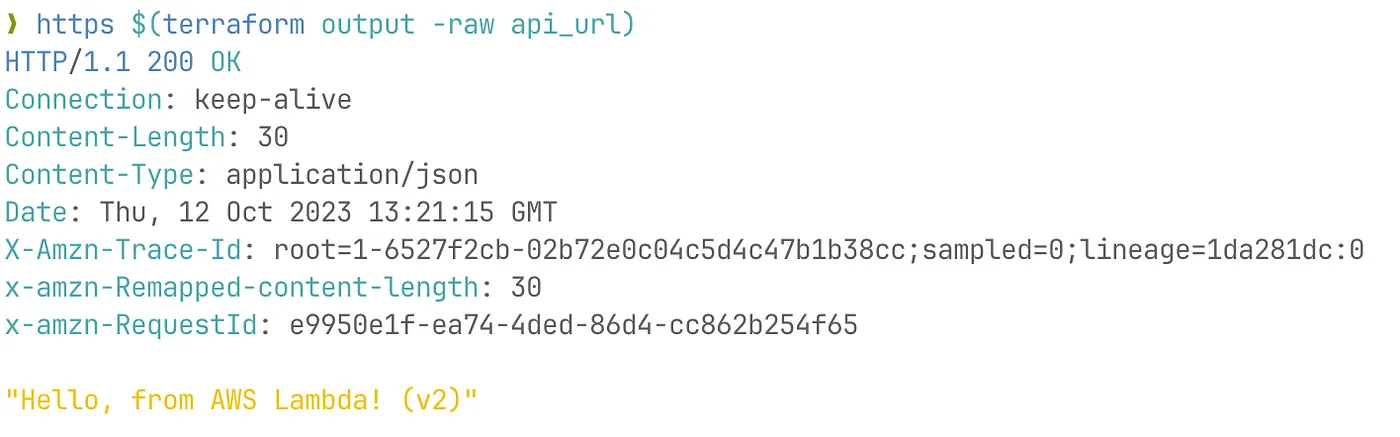
New application version available on same URL!
Note: https is binary from httpie.
Next, depending on requirements, we can add AWS Lambda to Route53 (so that there is a link to our domain), configure restriction policy. But these are topics for another article. Good luck with your AWS journey!